


Updated on: 2025-12-21
Thinking about a shower door enclosure for your bathroom project? This guide walks you through glass types, door styles, measurements, and maintenance so you can plan with confidence. You will find a simple comparison, a buyer’s checklist, and answers to common questions. Along the way, you will also see practical tips to help you coordinate hardware and finishes for a cohesive look.
Table of Contents
- Choosing the Right Shower Door Enclosure
- Did You Know?
- Comparison: Pros & Cons
- Buyer’s Checklist
- Final Thoughts & Advice
- Q&A Section
- About the Author Section
Choosing the Right Shower Door Enclosure
A well-planned glass shower transforms both function and style. The right layout makes daily routines easier, the correct hardware improves reliability, and the glass choice influences light, privacy, and cleaning. Below, you will find a concise, step-by-step way to understand options and choose with calm confidence.
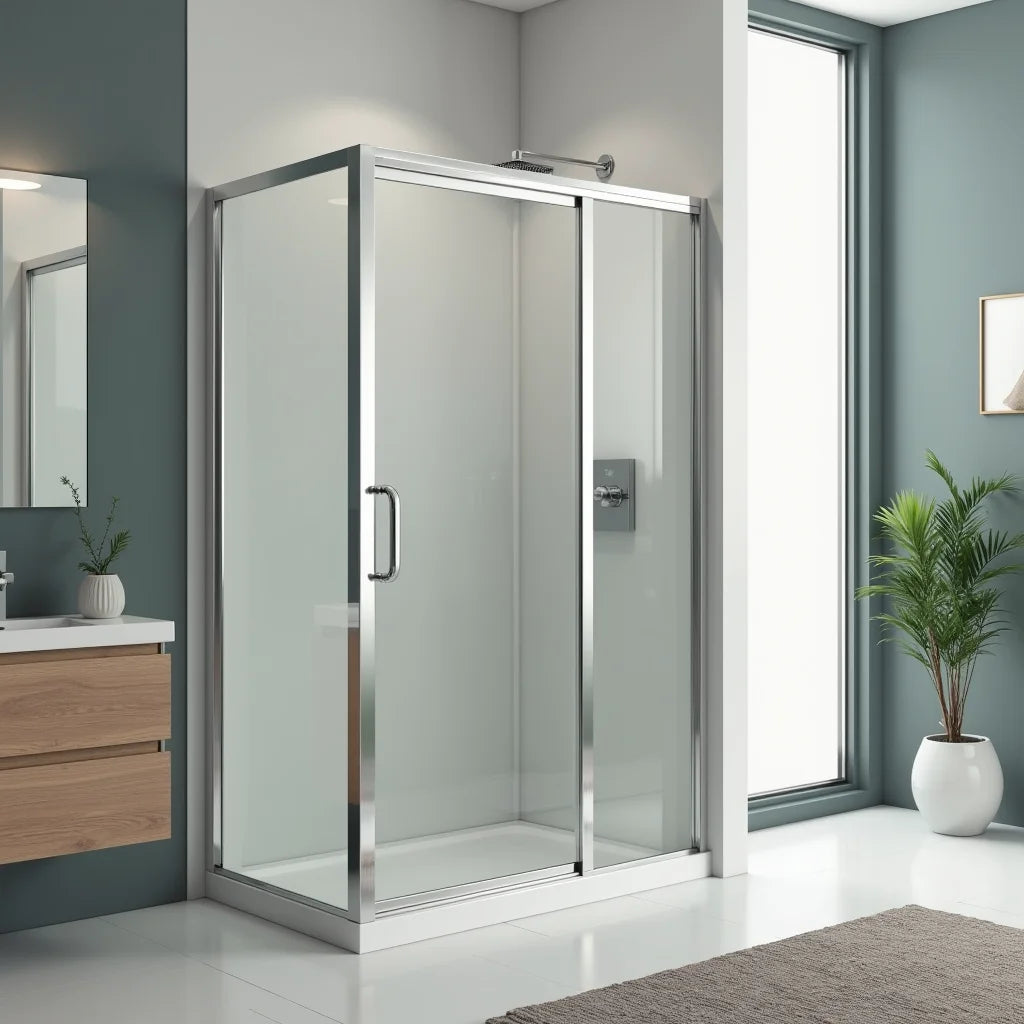
Frameless vs. Framed
Frameless designs use thicker tempered glass with minimal metal, creating a clean, open look that helps small bathrooms feel larger. They are usually easier to squeegee and show off tile beautifully. Framed systems add metal around the glass edges and can be budget-friendlier, with strong rigidity and classic styling. If you prefer a seamless, modern aesthetic, frameless may appeal; if you value cost control and sturdy edging, framed can be a thoughtful choice.
Sliding vs. Pivot
Sliding (bypass) doors save floor space because panels glide past each other, making them ideal for narrow rooms or tight clearances near toilets and vanities. Pivot (swing) doors open on hinges for a wide entrance and simple operation. Consider the swing arc and obstructions like towel bars, toilets, or radiators. If you have a compact bath, sliding panels often fit gracefully; if you have ample space, a hinged door can feel luxurious and easy to maintain.
Glass Options and Thickness
Tempered safety glass is standard and engineered to resist impact. Low-iron glass reduces the green tint for high-clarity views of stone or tile. Frosted, textured, or patterned glass increases privacy while still allowing light to pass through. Thickness commonly ranges from 6 mm to 10 mm for residential use; thicker panels feel substantial and support minimal hardware, while thinner panels are lighter and may be more budget friendly.
Measuring and Fit
Accurate measurement reduces installation challenges and helps prevent leaks. Check wall plumb, threshold level, and opening width at three points (top, middle, bottom). Note your curb height and any slope for drainage. If you plan to pair the enclosure with new fixtures, map valve and showerhead placement early. For inspiration on coordinating fixtures, explore thoughtful shower sets that complement modern glass styles.
Care and Cleaning
Daily maintenance can be simple. A quick squeegee after use reduces water spots and soap film. Hydrophobic glass coatings help repel minerals and make weekly wipe-downs faster. Choose hardware finishes that match the rest of your bathroom to disguise smudges and create a cohesive look. If you enjoy step-by-step shopping advice, browse Allfixture’s practical buying guides for helpful planning tips.
Budget and Installation
Frameless panels and custom sizes tend to cost more than framed, semi-frameless, or standard widths. Professional installation is common because precise alignment and watertight seals matter. If you are refreshing fixtures at the same time, consider upgrading to a durable, matching set such as a solid brass shower set to ensure reliable performance and a unified finish palette. Coordinating trim and handles helps your bathroom look calm and consistent.
Did You Know?
- Tempered safety glass is designed to reduce the risk of sharp shards if broken.
- Low-iron glass shows true tile and stone colors by minimizing green tint.
- Hydrophobic coatings can help water bead and roll off, reducing spots.
- Proper ventilation reduces condensation on glass and hardware.
- Clear silicone and well-placed sweeps help keep water inside without bulky frames.
Comparison: Pros & Cons
-
Frameless
- Pros: Clean, modern lines; easier to squeegee; highlights tilework.
- Cons: Higher cost; heavier panels; precise installation required.
-
Framed
- Pros: Budget-friendly; stable edges; classic look.
- Cons: More metal to clean; slightly smaller visual opening.
-
Sliding (Bypass)
- Pros: Saves floor space; convenient in tight layouts.
- Cons: Track maintenance; narrower access than a swing door.
-
Pivot (Hinged)
- Pros: Wide entry; simple operation; track-free opening.
- Cons: Needs floor clearance; door swing planning required.
-
Clear vs. Frosted/Patterned
- Clear: Bright and open; shows tile details.
- Frosted/Patterned: Added privacy; diffuses light for a softer look.
Buyer’s Checklist
- Confirm exact opening width and height at multiple points.
- Check wall plumb and curb level; note any out-of-square conditions.
- Choose door type (sliding or pivot) based on room clearance.
- Select glass style (clear, low-iron, frosted, or textured) and thickness.
- Match hardware finish with faucets and accessories for a cohesive feel.
- Plan ventilation to reduce condensation on glass surfaces.
- Consider coatings for easier cleaning and fewer water spots.
- Decide on professional installation and lead time.
- Review care habits (squeegee, soft cloth, gentle cleaners).
- Coordinate fixtures; for example, pair with complementary bathroom faucets.
Final Thoughts & Advice
Glass doors can elevate light, comfort, and everyday ease. When you consider layout first, then select door movement, glass type, and hardware, decisions become simpler. Small touches—like consistent finishes and a reliable squeegee routine—help your bath look fresh with minimal effort. Take your time, compare a few options, and choose a solution that fits your space, budget, and cleaning preferences.
Q&A Section
How do I measure for a glass enclosure?
Use a reliable tape measure and check width at the top, middle, and bottom of the opening. Note height from the finished floor or curb to the desired door top. Use a level to assess wall plumb and curb level since minor variations can affect fit. Take clear photos of corners and thresholds, and record each measurement. If anything seems inconsistent, consider a professional site visit for verification.
What glass thickness should I choose?
Many residential setups use 6 mm to 10 mm tempered glass. Thicker panels feel sturdy and allow minimal metal, which suits modern designs. Thinner glass can be more economical and lighter for installers. Your door type matters too: frameless hinged panels often benefit from greater thickness, while some framed systems perform well with lighter glass. Balance aesthetics, budget, and hardware requirements when deciding.
Is DIY installation a good idea?
DIY can work for experienced renovators comfortable with precision drilling, leveling, and sealing. However, small alignment errors can lead to binding doors or leaks. Many homeowners choose professional installation for peace of mind and to protect warranties. If you are updating fixtures at the same time, planning the sequence—tile, glass, and plumbing—helps avoid rework, and curated options like quality best-selling fixtures can streamline choices.
About the Author Section
About the Author
This article was prepared by the Allfixture content team, which focuses on practical bathroom and kitchen planning. Our writers collaborate with product specialists to simplify choices around glass, hardware, and fixtures. We hope these tips help you plan with ease. Thank you for reading.


